IT: Using Teams in the Classroom
What's a Teams Classroom?
A Teams Classroom is collection of conversations, files, and tools located in one application. There is a separate Teams Classroom for every class you are teaching and these individual Teams are listed under the Teams icon when you open the application.
Students who are registered for your class will already be assigned to the Team. Inside a Teams Classroom you can have video sessions, share files, and collaborate with your students.
What you'll need:
-
Internet connection
-
Video Camera: you can use your built-in laptop camera or install an external USB camera.
-
Audio: You can use your built-in laptop speaker, but audio quality is important and will be better if you use external headphones with a mic. The mics/headphones that you use with your mobile phone should work well.
Sign into Teams:
-
Browse to https://portal.office.com and sign in with your Cooper Email and O365 password.
-
In O365 menu, click Applications icon:
Select Teams:
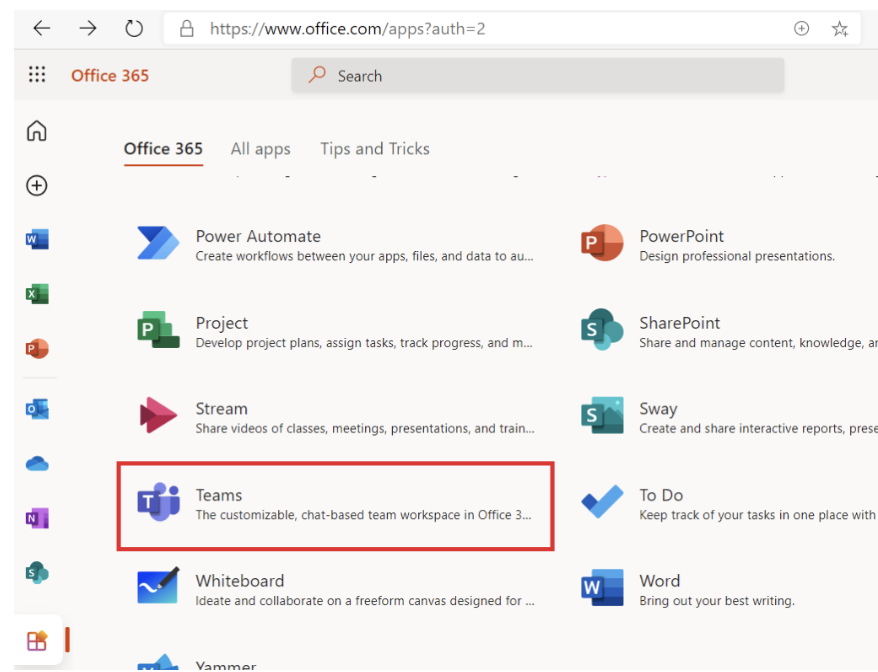
Teams Web Version vs. Desktop Application:
The Teams web version above will allow you to log in and use basic Teams functions like video, audio, share screen etc. from your browser. However, in order to access the full set of features within Teams you need to download and install the Teams desktop application:https://www.microsoft.com/en-us/microsoft-teams/download-app
Upon launching the Teams application you will need log in with your Cooper email address and password.
You can review the differences between Teams web and Teams desktop version here.
Open your Teams Classroom:
-
Select Teams
on the left side of the app and then pick your Teams Classroom.
-
Every Teams Classroom will have a General channel. The General channel is used to post notifications about your class and host video sessions. You can also create additional channels that pertain to specific topics or lectures and host video sessions in each of these separate channels.
Example below: The default General channel and a manually added SharePoint Tips and Tricks channel is listed. To add a channel, click on ‘…’ next to the name of the class and select add channel. For now, we’ll focus on using the General channel for all communication with your students. If you are interested in advanced training using different channels and built-in classroom notebook, we please see our video training on this topic.
For now, we’ll focus on using the General channel for all communication with your students. If you are interested in advanced training using different channels and built-in classroom notebook, we please see our video training on this topic.
1. Click on the General channel and Posts tab to start a chat notification. This will present a chat window where you can notify your students of the upcoming video session, example below:
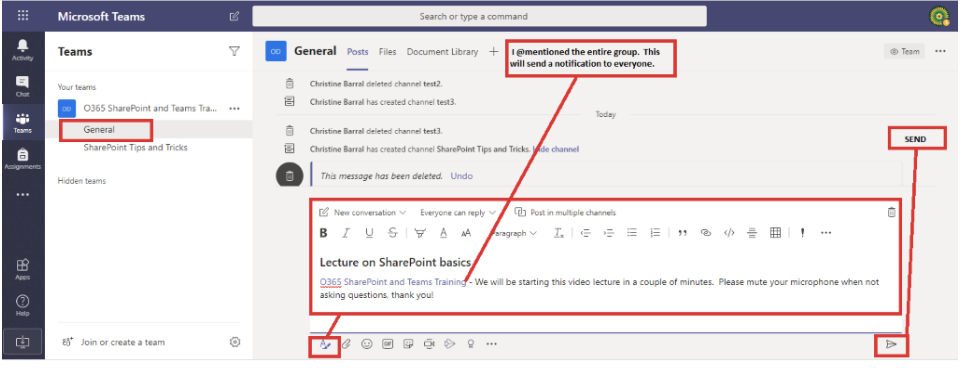
Note: When you are done composing your chat notification be sure to click ‘Send’ highlighted above.
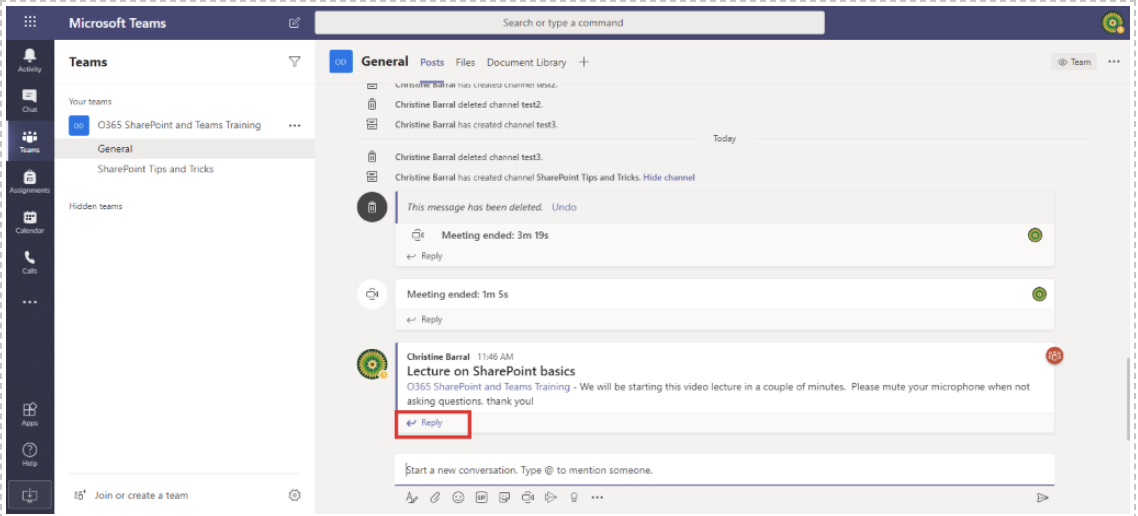
2. To start the video session simply reply to the notification chat you just sent:
3. Click the video icon to meet now:
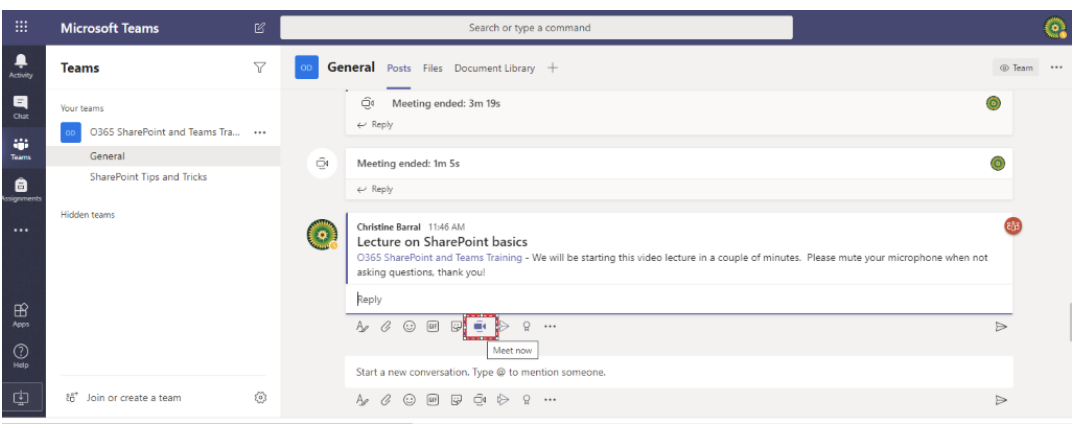
4. Click on Meet Now to start the video session:
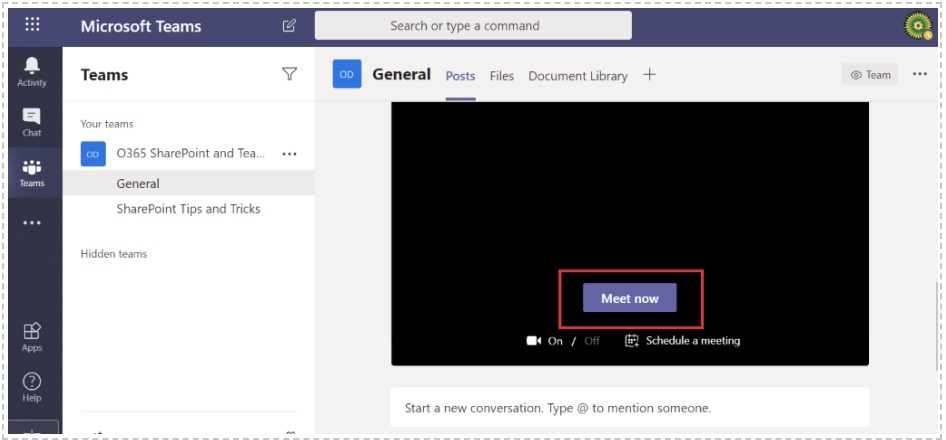
Teams video features:
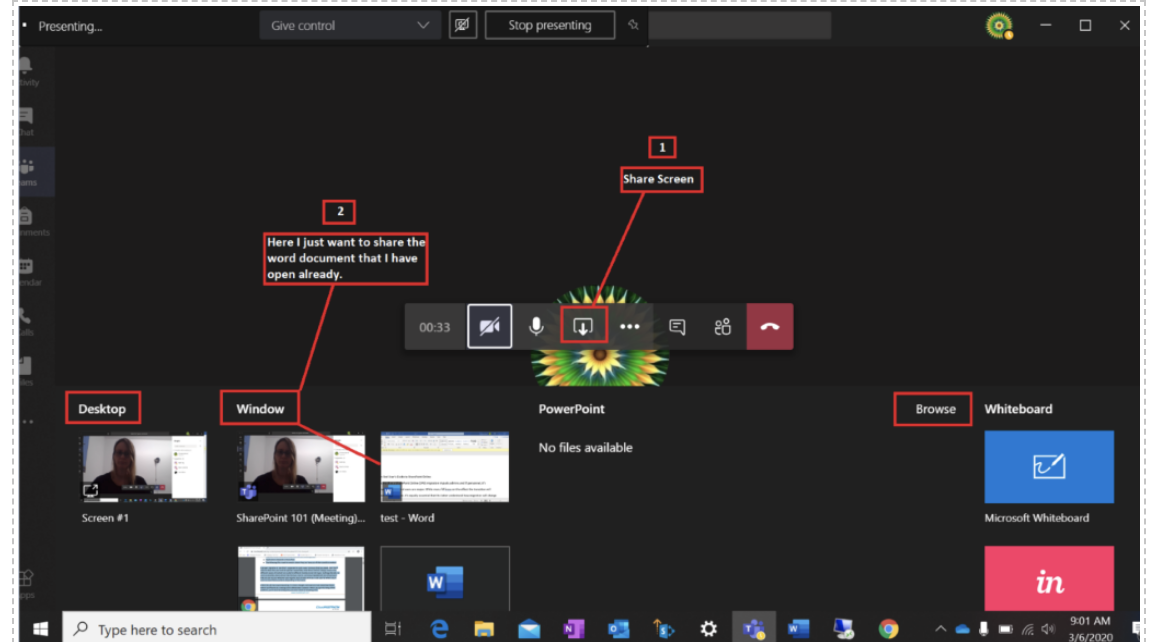
5. Once the meeting has started you will have a few of ways to share content:
By clicking ‘share screen’ you can share your Desktop, Window (for a specific app or document), or browse to a PowerPoint presentation. Note: browse only opens PowerPoint files (this is a Microsoft limitation).
In this example, we’ll share a window, and I will choose a word document that I already have open in my toolbar:
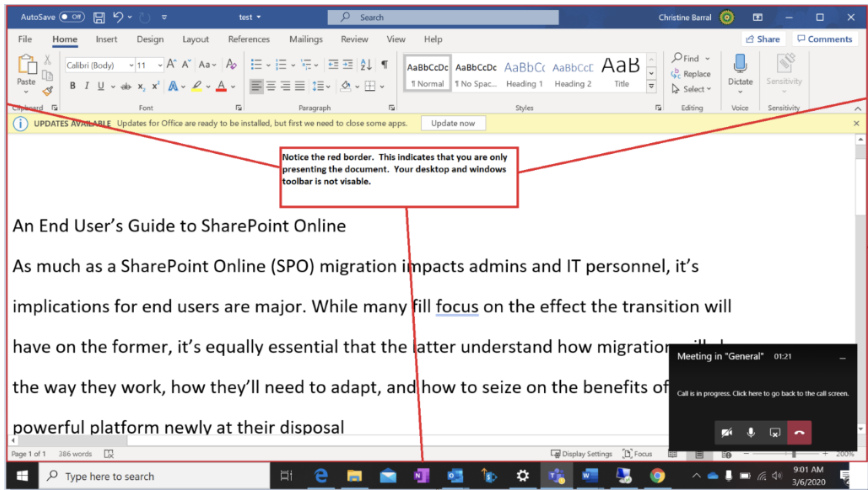
Only the document will be in view:
Once you are done, move your mouse cursor toward the top of the screen and click ‘Stop presenting’. Stop presenting will not end the video session, it will only stop sharing your screen.
![]()
More information on sharing during a video session:
-
Use your external USB camera and point it to a piece of paper or white board where you can draw a diagram. To see more about using document cameras, go here.
-
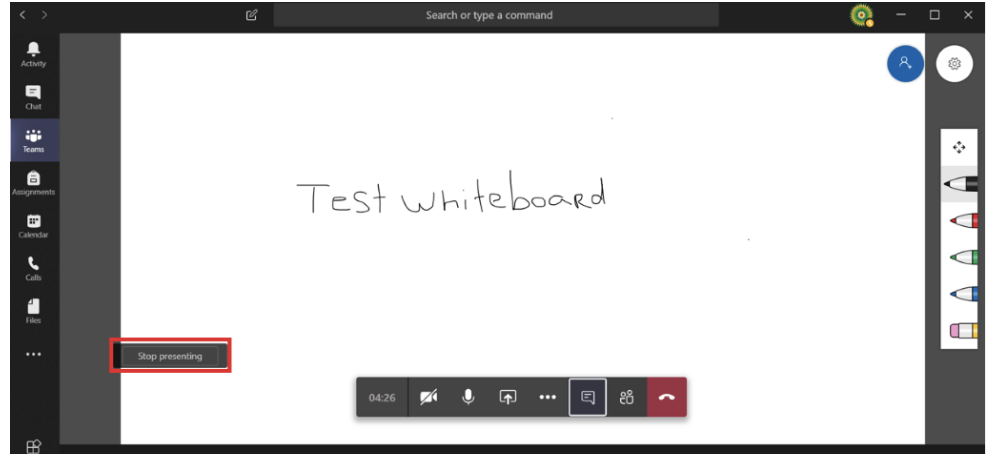
Use Teams built-in white board feature to draw diagrams by sharing your screen and then clicking whiteboard.
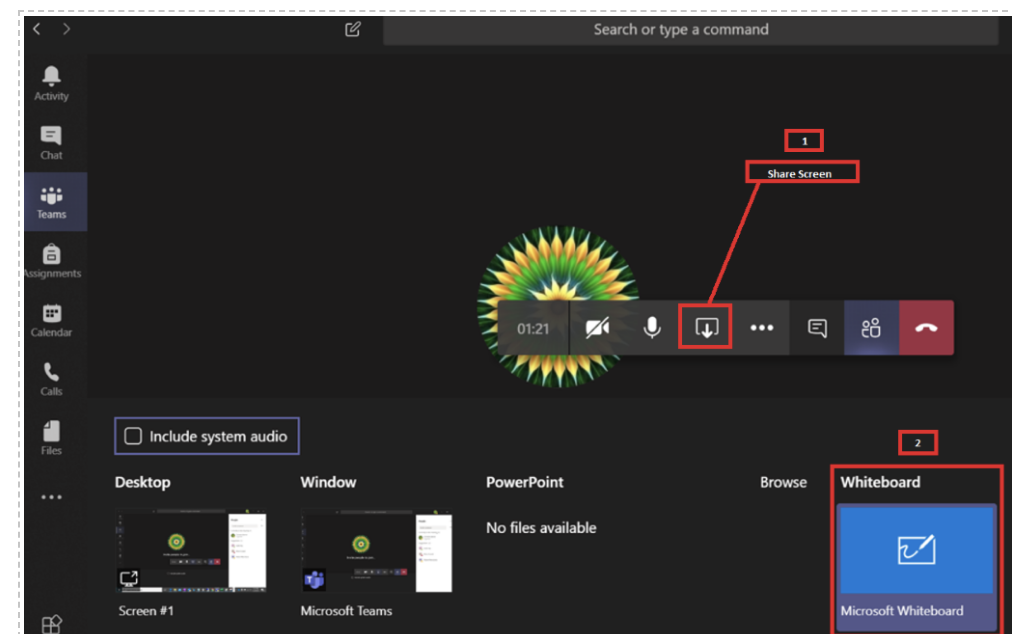
Note: To use this feature effectively you will need to present using a tablet with stylus. Using the mouse to draw on the whiteboard will be less than ideal for most people.
To end whiteboard, move your mouse to the right or the bottom of the screen and click ‘stop presenting’.
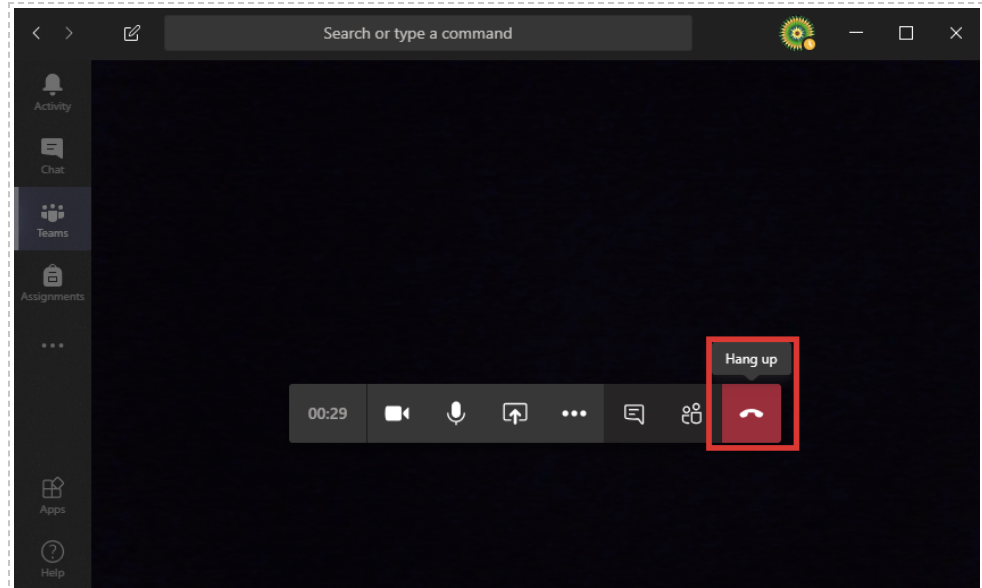
6. To end the video session, you need to select Hang up:
Troubleshooting in Teams during class:
If the person you’re training doesn’t join the meeting:
-
Email them a link to the meeting and ask them to join
-
If that doesn’t work, email them with directions to how to find the event and join it.
-
If they cannot join the scheduled event, exit it and start an ad hoc video session via the Chat tab in Teams.
If there are bandwidth or connection issues:
- The instructor can turn off their video to conserve bandwidth
- The instructor can close browsers and other internet applications (OneDrive, Dropbox, etc.) during the meeting


